FAQs
Find answers to frequently asked questions about Lexar products.
Find answers to frequently asked questions about Lexar products.
Yes, SDXC cards work on SDHC host devices. The image below shows the host device and the memory cards supported in detail.
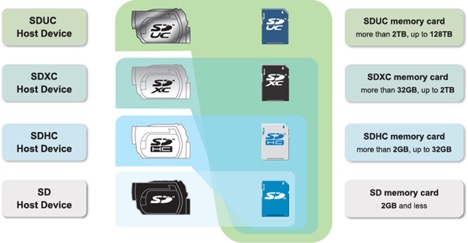
Cards and host devices -SDUC memory cards must only be used with SDUC host devices. -SDXC memory cards can be used with SDXC and SDUC host devices. -SDHC memory cards can be used with SDHC, SDXC and SDUC host devices. -SD memory cards can be used with SD, SDHC, SDXC and SDUC host devices. Additional info on cards and host devices -SDUC Host Devices can use SD, SDHC, SDXC and SDUC memory cards. -SDXC Host Devices can use SD, SDHC and SDXC memory cards. -SDHC Host Devices can use both SD and SDHC memory cards. -SD Host Devices can only use SD memory cards. *Source: SD Association
SDXC/microSDXC cards and 256GB CompactFlash cards are formatted natively in the exFAT file system. Flash Drives may also be formatted in exFAT. The operating system must support the exFAT file system in order for these devices to function properly. You may need to update the operating system on your devices to recognize the SDXC/microSDXC cards. Operating Systems that Support the exFAT File System
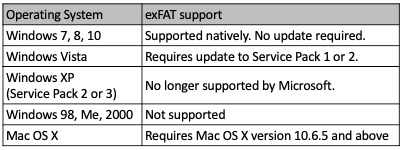
NOTE: Some Host devices may NOT support SDXC cards. SDXC/microSD cards CANNOT be used with Windows 98, Me, 2000.
The development of technologies like XQD™ and CFast™ address the increasing capabilities of today’s cameras, as well as the ever-growing demands placed on professional photographers and videographers.
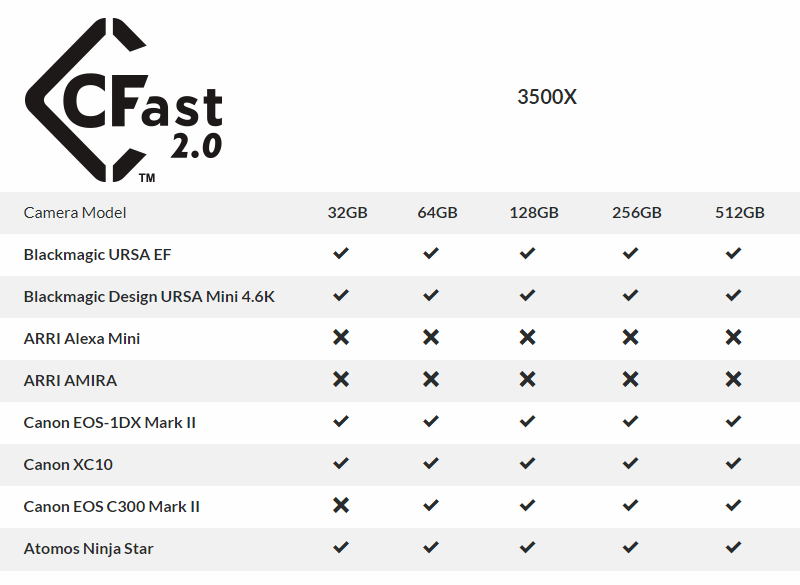
Please refer to the chart below and check with your device manufacture’s website to download compatible firmware.
| Camera Brand | Model | Lexar CFe Compatibility |
| Canon | EOS R5 | Yes |
| EOS-1D X Mark III | Yes | |
| EOS C500 Mark III | Yes | |
| EOS C300 Mark II | Yes | |
| Panasonic | S1 | Update FW 1.5 or higher |
| S1R | Update FW 1.5 or higher | |
| Nikon | Z7 | Update FW 3.0 or higher |
| Z6 | Update FW 3.0 or higher | |
| D6 | Yes | |
| D5 / D850 / D500 | Camera FW not released |
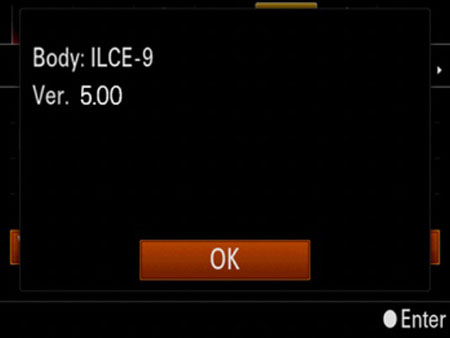
The SONY camera models below may have compatibility issues if the latest firmware has not been updated to the versions in Step 2. Camera models: Sony Alpha 9 (SONY ILCE-9) Sony Alpha 7R III (SONY ILCE-7RM3) Sony Alpha 7 III (ILCE-7M3) If you’ve encountered this error message, please follow the steps below to update your SONY camera firmware.
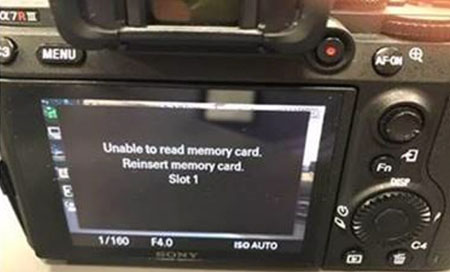
Step 1. Check the firmware version on your camera: Select Menu > Setup subpage [7] > Version on the camera. The system software (firmware) version will be displayed as shown below.
Step 2. Please use the links below to download the latest firmware and follow the installation instructions from the SONY website.
| Camera model | Firmware versions | Links for download and detailed installation instructions |
| Sony Alpha 9 (SONY ILCE-9) | Ver6.0 | Windows: Click here Mac: Click here |
| Sony Alpha 7R III (SONY ILCE-7RM3) | Ver3.01 | Windows: Click here Mac: Click here |
| Sony Alpha 7 III (ILCE-7M3) | Ver3.01 | Windows: Click here Mac: Click here |
Lexar recommend using the Lexar Recovery Tool. You can download the Tool at https://americas.lexar.com/downloads/ Please refer to the Lexar Recovery Tool section under FAQ page for detail. Disclaimer: Lexar does not guarantee to recover any your missing or deleted files. Lexar assumes no liability for damage to the customer’s equipment or data caused by the use or misuse of the format functions.
The Lexar nCARD is an ultra-compact micro storage card with patent/patents applications that are licensed by Huawei®. Compared with a microSD card, it features a 45% reduction in volume. It is identical to a Nano SIM card in appearance and dimensions, and can be used in the same slot as a Nano SIM card.
Check the compatibility list for Lexar: https://www.lexar.com/support/compatibility/
Please refer to Lexar compatibility list.
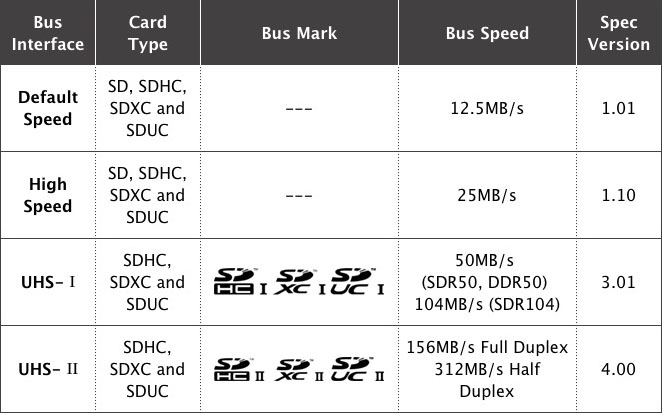
UHS stands for “Ultra High Speed” and refers to the new technology that enables higher bus interface speeds on Secure Digital High Capacity (SDHC) and Secure Digital Extended Capacity (SDXC) cards. UHS-I defines interface speeds up to 104MB/sec. A SDHC or SDXC card that supports “UHS” could have performance up to 104MB/sec. UHS-II is the next generation of UHS. UHS-II improves the interface speed up to 312MB/s. That is 3 times faster than UHS-I.
Lexar recommend using the Lexar Recovery Tool. You can download the Tool at https://americas.lexar.com/downloads/ Please refer to the Lexar Recovery Tool section under FAQ page for detail. Disclaimer: Lexar does not guarantee to recover any your missing or deleted files. Lexar assumes no liability for damage to the customer’s equipment or data caused by the use or misuse of the format functions.
Yes, SDXC cards work on SDHC host devices. The image below shows the host device and the memory cards supported in detail.
Cards and host devices -SDUC memory cards must only be used with SDUC host devices. -SDXC memory cards can be used with SDXC and SDUC host devices. -SDHC memory cards can be used with SDHC, SDXC and SDUC host devices. -SD memory cards can be used with SD, SDHC, SDXC and SDUC host devices. Additional info on cards and host devices -SDUC Host Devices can use SD, SDHC, SDXC and SDUC memory cards. -SDXC Host Devices can use SD, SDHC and SDXC memory cards. -SDHC Host Devices can use both SD and SDHC memory cards. -SD Host Devices can only use SD memory cards. *Source: SD Association
SDXC/microSDXC cards and 256GB CompactFlash cards are formatted natively in the exFAT file system. Flash Drives may also be formatted in exFAT. The operating system must support the exFAT file system in order for these devices to function properly. You may need to update the operating system on your devices to recognize the SDXC/microSDXC cards. Operating Systems that Support the exFAT File System
NOTE: Some Host devices may NOT support SDXC cards. SDXC/microSD cards CANNOT be used with Windows 98, Me, 2000.
The Lexar Professional USB Dual-Slot Card Readers are compatible with the Lexar Professional 1066x CF cards. To optimize the card’s performance, pair the Lexar Professional 1066x CF card with a Lexar Professional USB 3.0 Dual-Slot Reader, which now supports UDMA 7. A firmware download is essential for 1066x CF card functionality on the older Lexar Professional USB 3.0 dual-slot card reader, and can be downloaded here.
Yes! All Lexar CF memory cards built with CF 6/UDMA 7 technology can be used with existing CF and CF UDMA devices (backwards compatible). Pairing your CF 6/UDMA 7 enabled CF memory card with a CF 6/UDMA 7 enabled host device is recommended to fully take advantage of the performance benefits from your CF 6/UDMA 7 enabled memory card.
Lexar recommend using the Lexar Recovery Tool. You can download the Tool at https://americas.lexar.com/downloads/ Please refer to the Lexar Recovery Tool section under FAQ page for detail. Disclaimer: Lexar does not guarantee to recover any your missing or deleted files. Lexar assumes no liability for damage to the customer’s equipment or data caused by the use or misuse of the format functions.
Lexar recommend using the Lexar Recovery Tool. You can download the Tool at https://americas.lexar.com/downloads/ Please refer to the Lexar Recovery Tool section under FAQ page for detail. Disclaimer: Lexar does not guarantee to recover any your missing or deleted files. Lexar assumes no liability for damage to the customer’s equipment or data caused by the use or misuse of the format functions.
While CFexpress Type B cards and XQD cards can fit in the same slot, compatibility depends on the host devices. Please check compatibility of your host device with your manufacture.
The difference between the three cards are the form factor, number of lanes and maximum performance. Currently the most used card is the Type B due to its similarities in size with XQD cards.
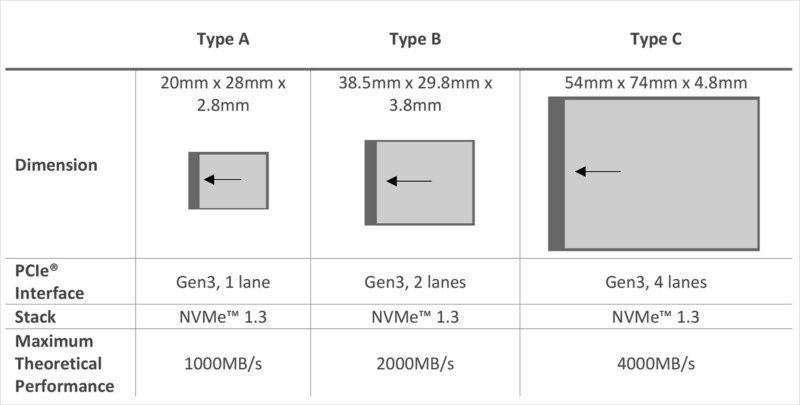
CFexpress is the latest standard for removable media cards proposed by the CompactFlash Association. The standard uses PCIe 3.0 interface with 1 to 4 lanes where 1 GB/s data can be provided per lane. NVM Express is also supported to provide low overhead and latency. For more information, click here https://www.compactflash.org/cfexpress
From time to time, it’s recommended to refresh your CFast card for maximum performance. Please go to https://www.lexar.com/support/downloads/ to download our CFast Refresh Tool.
CFast is the latest evolution of card format from the CompactFlash Association and provides a higher maximum transfer rate than CompactFlash® cards. CFast cards are similar in size to CompactFlash cards, but do not have any pins which can bend in the connector. The format was primarily designed to support the capabilities of next-generation of camcorders and DSLR cameras.
Lexar recommend using the Lexar Recovery Tool. You can download the Tool at https://americas.lexar.com/downloads/ Please refer to the Lexar Recovery Tool section under FAQ page for detail. Disclaimer: Lexar does not guarantee to recover any your missing or deleted files. Lexar assumes no liability for damage to the customer’s equipment or data caused by the use or misuse of the format functions.
1. In general speaking, if SSD supports SATA interface, the driver is built in Windows 7 & 10. No need to install any third-party driver.
2. If SSD supports PCIe, an NVMe driver must be installed in Windows 7. Windows 10 has native driver for PCIe SSD.
Please go to the Lexar official website – Support and Services – Download Center screen, select the SSD product, see whether the new version of the firmware. Select the firmware upgrade package of the corresponding specifications, download it, and perform operations according to the upgrade guide in the attachment. For example, if the performance of the NM610PRO is low, log in to the Lexar official website, find the NM610PRO Firmware Upgrade, download the corresponding capacity, and follow the upgrade instructions in the attachment.
Modifying or tampering with your SSD drive will void your warranty.
SSD has a mechanism, wear leveling. This mechanism ensures every single physical storage units get the same P/E cycle. It aims to extend the working life. Defragmentation is not required.
M.2 slot may only support SATA protocol. Please contact the service center or visit the websites of your PC/laptop/motherboard manufacturer to realize the specification details before purchasing M.2 PCIe SSD
1. Testing values vary with different benchmark tools.
2. The version of tools also has an impact on testing result.
3. The platforms could influence the result as well. Generally, the performance would be better on high-end platform
4. If SSD was used before and contains data inside, it could get a bit of slower Every single test has little difference results even in the same condition.
M.2 is known as NGFF (Next Generation Form Factor), enables expansion, contraction, and higher integration of functions onto a single form factor specification. SSD is one of the devices adopts M.2, and it offers slim, compact sized to be flexible in different devices.
TRIM is an OS (Operating System) command set, which was started supporting in Windows 7. When user deletes a file, OS sends TRIM to inform SSD about the operation, then SSD marks the specific storage units to invalid state. Once the GC operates, GC could be more precise and efficient to erase the storage unit without unnecessary reallocation of data in flash memory.
In SSD, lots of scattered data pieces will generate in use. The Garbage Collection (so called GC) mechanism is to move these pieces into specific physical units, and then to reuse the original units to store new data. Garbage Collection is necessary and results in overall performance of SSD. Lexar optimizes the algorithm for highly efficient GC to ensure SSD works smoothly.
System cloning is the recommended way to transfer the operating system to SSD. It would keep all data, setting, drivers that needed for your computer. To clone your drive, Lexar recommends EaseUS Todo Backup as assistant, please visit https://www.easeus.com/ to have more detail.
S.M.A.R.T stands for “Self-Monitor and Report Technology”, is built in hard drives and solid-state drives to indicate condition of drives. All Lexar SSD series support S.M.A.R.T, and Lexar provides SSD Dash, free downloaded tool on Lexar official website to help users get S.M.A.R.T values easily. The S.M.A.R.T contains Average P/E Cycle Count, Total Power-on Time, Power-on Cycle Count, Total Host Writes/Read and other specific information.
One of the biggest differences between SSD and HDD, is that SSD drives have no moving parts. Since there are no moving parts, SSD drives are significantly faster, quieter, and more resistant to shock and vibration.
No, please verify your laptop or desktop supports NVMe SSD Drives.
M.2 slot may only support SATA protocol. Please contact the service center or visit the websites of your PC/laptop/motherboard manufacturer to realize the specification details before purchasing M.2 PCIe SSD.
1. In general speaking, if SSD supports SATA interface, the driver is built in Windows 7 & 10. No need to install any third-party driver.
2. If SSD supports PCIe, an NVMe driver must be installed in Windows 7. Windows 10 has native driver for PCIe SSD.
Please go to the Lexar official website – Support and Services – Download Center screen, select the SSD product, see whether the new version of the firmware. Select the firmware upgrade package of the corresponding specifications, download it, and perform operations according to the upgrade guide in the attachment. For example, if the performance of the NM610PRO is low, log in to the Lexar official website, find the NM610PRO Firmware Upgrade, download the corresponding capacity, and follow the upgrade instructions in the attachment.
Modifying or tampering with your SSD drive will void your warranty.
SSD has a mechanism, wear leveling. This mechanism ensures every single physical storage units get the same P/E cycle. It aims to extend the working life. Defragmentation is not required.
1. Testing values vary with different benchmark tools.
2. The version of tools also has an impact on testing result.
3. The platforms could influence the result as well. Generally, the performance would be better on high-end platform
4. If SSD was used before and contains data inside, it could get a bit of slower Every single test has little difference results even in the same condition.
TRIM is an OS (Operating System) command set, which was started supporting in Windows 7. When user deletes a file, OS sends TRIM to inform SSD about the operation, then SSD marks the specific storage units to invalid state. Once the GC operates, GC could be more precise and efficient to erase the storage unit without unnecessary reallocation of data in flash memory.
In SSD, lots of scattered data pieces will generate in use. The Garbage Collection (so called GC) mechanism is to move these pieces into specific physical units, and then to reuse the original units to store new data. Garbage Collection is necessary and results in overall performance of SSD. Lexar optimizes the algorithm for highly efficient GC to ensure SSD works smoothly.
S.M.A.R.T stands for “Self-Monitor and Report Technology”, is built in hard drives and solid-state drives to indicate condition of drives. All Lexar SSD series support S.M.A.R.T, and Lexar provides SSD Dash, free downloaded tool on Lexar official website to help users get S.M.A.R.T values easily. The S.M.A.R.T contains Average P/E Cycle Count, Total Power-on Time, Power-on Cycle Count, Total Host Writes/Read and other specific information.
One of the biggest differences between SSD and HDD, is that SSD drives have no moving parts. Since there are no moving parts, SSD drives are significantly faster, quieter, and more resistant to shock and vibration.
Please refer to our quick start guide at https://americas.lexar.com/downloads/
In-App or External Storage memory used (%) and memory availability are displayed at the top of the home screen]
In-App Storage is the memory partition within the Lexar Mobile Manager app only, and doesn’t include all the files that you have saved on your iPhone/iPad. It doesn’t allow you to browse those files that are saved directly on your device – only those saved within the app. This restriction is set by Apple® iOS, not the app developer.
Tap the ‘In-App Storage’ or ‘External Storage’ icons at the top or in the main menu. This will access the relevant storage file manager.
Yes, the Mobile Manager app can still function without an external drive connected, however the functionality involving external storage will not be available. When trying to use external storage features, you’ll see a pop-up window that says “Device not Connected”. External Storage on the home screen will show as N/A when no drive is connected.
Make sure your Lexar iOS compatible memory product is connected to your phone. Tap the ‘External Storage’ or ‘In-App Storage’ icon, depending on where the file is currently located. Tap ‘Select’ on the top right corner and select the file(s) to copy or move by tapping the button next to the file. Tap ‘Copy’ or ‘Move’ then select ‘In-App Storage’ or ‘External Storage’, depending where the files are to be copied/moved to. Select the file destination and tap ‘Copy here’ or ‘Move here’.
Tap the ‘Video’ icon to enter the menu. Tap the arrow under ‘In-App Storage’ at the top to expand the menu and tap on ‘Camera Roll.’ Navigate to the folder containing the videos and tap ‘Select’ at the top right and then select the video(s) you want to copy. If you want to send them to the root folder within In-App Storage or External Storage, select ‘Sync to In-App’ or ‘Sync to External.’ If you want to send the file to a specific folder select ‘Copy,’ navigate to the required destination and tap ‘Copy Here.’
Tap the ‘Video’ icon to enter the menu. Tap the ‘Photo’ icon to enter the menu. Navigate to the relevant folder or album within Camera Roll and tap ‘Select’ at the top right hand corner. Select the photo(s) you want to copy. If you want to send them to the root folder within In-App Storage or External Storage, select ‘Sync to In-App’ or ‘Sync to External.’ If you want to send the file to a specific folder select ‘Copy,’ navigate to the required destination and tap ‘Copy Here.’
Tap ‘External Storage’ from the home screen. Navigate to the file(s) you want to copy or move to the Camera Roll (limit of 20 files). Tap ‘Select’ and then select the videos or pictures you want to copy or move. Tap ‘Copy’ or ‘Move’ and then select ‘Camera Roll.’
Files in External Storage cannot be renamed within the app. They can be renamed on your computer. Connect your Lexar iOS-compatible product to the USB port of your Mac/PC and then rename the files as you normally would through your Operating System. You can also copy or move the file to In-App storage, and then follow the instructions for renaming a file in In-App Storage.
From the home screen tap ‘In-App Storage,’ navigate to the file, tap ‘Select’ at the top right corner, and select file(s) you want to rename. Tap ‘More,’ then select ‘Rename.’ Enter the new name and tap the checkmark to create the new name. 7. How do I create a new folder in External or In-App Storage? Go to the In-App Storage or External Storage menu. Tap ‘Add’, then select ‘New Folder.’ Enter the new folder name and tap the checkmark to create the folder.
Navigate to the file you would like to move and select the file. Tap ’move.’ Navigate to your desired destination folder, and select the folder. Tap ’move here‘ to move your file to this folder.
Go to the In-App Storage or External Storage menu. Tap ‘Add’, then select ‘New Text File.’ Type the text in the text box, then click on the title to change the file name. Click the checkmark at the top right to save the text file.
Find the file in the In-App Storage or External Storage menu. Slide from right to left on the file. Tap the red trash can icon to delete the file.
While in any category menu, tap ‘Select’ at the top right corner. Select file(s) and tap ‘More.’ Then select ‘Delete.’
Tap the Dropbox icon. Dropbox will ask for permission to connect with the Lexar Mobile Manager app. Enter your Dropbox login details to allow access to your account via the Lexar Mobile Manager app.
Tap the ‘Recorder’ icon to open the voice recorder function. Within the voice recorder, tap the red ‘Recorder’ button to begin recording, and the stop button when complete. You can hear your recording by tapping the play button, and you can delete the recording by tapping the ’X‘ button. Tap ’Save’ in the upper right hand corner. The file will be saved to the list within the Recorder with the time stamp as the file name. If you want to save a recording to In-App Storage or External Storage, navigate to In-App Storage or External Storage, tap ‘Add’ then select ‘Voice Recording,’ select the file you want to add, and tap ’Add.’
While in any category menu, tap ‘Select’ at the top right corner. Select the file(s) and tap ‘Share,’ then select ‘Mail.’
Long press on the attachment in an email. Select ‘Import with Mobile Manager’ app to save to the root folder in In-App Storage. 16. How do I print documents in the Lexar Mobile Manager? (requires an AirPrint enabled printer) Open or select a file and tap ‘Share.’ Choose ‘Print’ from the Share menu.
Connect a Lexar iOS-compatible product to your Apple device. Tap the music or video icon to enter the relevant menu. Tap the arrow at the top to expand the menu. Choose ‘External Storage’ and tap any music or video file to start playing it.
Tap the music or video icon to enter the relevant menu. Select the relevant folder. Tap on any music or video file to start playing it.
Connect a Lexar iOS-compatible product to your Apple device. Tap the ‘Photo’ icon on the home screen. Tap the arrow at the top to expand the menu. Choose ‘External Storage’ and tap any image file to view it.
Tap the ‘Photo’ icon on the home screen. Tap the arrow at the top to expand the menu. Choose ‘In-App Storage’ and tap any image file to view it.
Movie files bought through iTunes are protected (Digital Rights Managed or DRM) files and are not accessable through third party software such as the Lexar Mobile Manager app.
Connect a Lexar iOS-compatible product to your Apple device. Tap the ‘Contact Backup’ or ‘Photo Backup’ icon to enter the relevant menu. Tap the ‘Backup’ button to start the backup. The time stamp will be displayed in ”Previous Backup” when the process is complete. The backup files are stored in External Storage in a folder called ”Backup.”
Connect a Lexar iOS-compatible product to your Apple device. Tap the ‘Contact Backup’ or ‘Photo Backup’ icon to enter the relevant menu. Tap the ‘Restore’ button to enter the restore options. To restore Contacts, select the file you wish to restore from. To restore Camera Roll, select ‘Restore All Files’ or ‘Select file(s)’. The time stamp will be displayed in ”Previous Restore” when the process is complete. Note: Current Contacts will be replaced by the backup file.
Tap the ‘Settings’ icon from the home screen. Select the items to be automatically backed up when a Lexar iOS‑compatible product is connected to the iOS device. Contacts and/or Photos will then be automatically backed up whenever your Lexar iOS-compatible device is connected to your phone. 4. Can I cancel while backup or restore is in progress? Yes, tap on the ‘X’ button to cancel the backup process. Note: If you cancel during Photo Backup, the app will pick up from where you left off next time you tap ‘Backup.’ Security Features 1. How do I encrypt (password protect) files or a folder within In-App Storage or External Storage? Navigate to the file you would like to lock and tap ‘Select’ at the top right corner. Select the file(s) or folder. Tap ‘More,’ then select ‘Lock.’ Enter any alphanumeric characters twice to confirm. Tap the ‘checkmark.’ The extension of locked files will be changed to “.locked.” Note: Only files and folders stored in “In-App Storage” or “External Storage” can be locked.
Tap on the ‘locked file’ or ‘folder.’ You will be prompted to enter the password to unlock it. Tap the ‘checkmark.’
Open the Lexar Mobile Manager app and go to ”Settings.” Tap ‘App Lock’ and enter a four digit numeric passcode. Follow the prompt and re-enter the password to confirm. The app is now locked. Once enabled, you will be prompted to enter the 4‑digit passcode every time the app is launched. To disable the app lock, turn App Lock off in Settings. Enter the four digit numeric password used to initially lock the app.
Please re-attach the flash drive and run the application again.
The total capacity is divided up between the public partition and secure partition. Users can change the capacity of the secure partition once their fingerprints have been authenticated.
Only the public partition can be accessed through your smartphone.
The initial format of the F35 is FAT32; you need to re-format it to exFAT when transmitting files larger than 4GB. Please note all files on the drive will be lost if you re-format. However, the fingerprint application itself, will not be erased.
The fingerprint application can be operated in Windows XP, Windows Vista, Windows 7, Windows 8, Windows 10.
The fingerprint application requires Windows XP and up.The fingerprint application is required to setup any accounts or changes to the partition size.
Regular flash drive use is compatible with Windows, Linux, and macOS.
The secure partition is designed to close after 15 minutes of inactivity for security purposes. To re-access the secure partition, simply place an authorized fingerprint on the sensor and it will re-open.
Encryption is based on the 256-bit AES method. The fingerprint data is saved on the flash drive with an exclusive UID produced by FP IC. Since the fingerprint data and fingerprint algorithm is separate, the data saved in the secure partition will be lost if the flash drive is dismantled by force.
If the user enters an incorrect password more than 254 times in succession, the F35 will start the process of self-destruction. All data in the USB flash drive will be erased, and the F35 can only be recovered by downloading the firmware again.
Ensure your fingerprint and sensor are clean and dry. If that doesn’t work, try re-attaching the flash drive.
To transfer files larger than 4GB, the USB flash drive must have an NTFS or exFAT file system. The default file system for the USB flash drive is FAT32, which cannot handle single files larger than 4GB (more precisely, one byte smaller than 4GB). Please follow the steps below to format the USB flash drive using the NTFS file system: Warning: all data on the USB flash drive will be lost! Before continuing, please backup the data on the USB flash drive.
1. Open “My Computer” (“Computer” for Vista and 7). Right click on the Lexar USB flash drive and select “Format”.
2. Select NTFS or exFAT from the file system drop-down list.
3. Select “Quick Format” as the format option and click “Start”. Note: If NTFS is not available, close the “Format” window and follow steps 4-9.
4. Right click on “My Computer” (“Computer” in Vista) and select “Properties”.
5. Select the “Hardware” tab and click “Device Manager”.
6. Expand the disk drives and right click on the Lexar USB flash drive. Select “Properties”.
7. Click the “Policies” tab and select “Optimize for performance”.
8. Click “OK”. 9. Repeat steps 1-3. Please note that MacOS 10.6.5 supports full read and write access to exFAT formatted drives. MacOS still only has read-only access to NTFS-formatted drives. Some devices (MP3 players, digital photo frames, etc.) cannot read NTFS or exFAT file systems. Moreover, Windows XP and Vista must be updated to access exFAT.
Although booting from the USB flash drive is possible, this is not a feature supported by Lexar. The USB flash drive is designed to be used as a storage device. Does the Lexar USB flash drive have write protection? The Lexar USB flash drive does not offer write protection. If you experience write protection messages when using the USB flash drive, please check the following:
1. Confirm that you are allowed to write to the removable storage device. There may be security settings in the operating system that disable write access to removable storage devices.
2. Confirm if you have used third-party software to enable write protection on your USB drive. If none of the above is true, then the USB flash drive may be faulty. Please contact our technical support for further assistance. Is USB3.0 the same as USB3.1? USB3.1 is a specification developed by the USB-IF. USB3.1 includes USB3.1 Gen1 and USB3.1 Gen2: USB3.1 Gen1 (SuperSpeed): The highest theoretical transfer speed is 5 Gb/s (equivalent to USB3.0). USB3.1 Gen2 (SuperSpeed+): The highest theoretical transfer speed is 10 Gb/s. The actual speed is based on product specifications.
Please check if the USB port on your computer is functioning normally and whether the flash drive driver is mounted. If the port function and driver are normal and the USB flash drive still cannot be recognized, please contact our technical support.
Heating up is normal for USB flash drives. Temperature may vary between metal casing and plastic casing due to the metal casing absorbing more heat.
Theoretically, USB 1.0 can transfer up to 1.5 Mb/s* USB 1.1 can transfer up to 12 Mb/s* USB 2.0 can transfer up to 480 Mb/s* USB 3.0 and 3.1 (Gen 1) can transfer up to 5 Gb/s* USB 3.1 (Gen 2) can transfer up to 10 Gb/s* *Actual performance may vary based on different products.
USB Type-C, also known as USB-C, is a universal serial bus (USB) connector. The biggest feature in appearance is that both ends are completely identical. Compared with the Micro-USB, this means that users do not have to find the correct orientation as both ends can be inserted. USB Type-C supports OTG, that is, in the absence of a host (such as a personal computer), data can be directly transferred between portable devices. It can support up to USB 3.1 specifications and is backward compatible.
It’s a substitute for the Mini-USB on many smart phones and tablets, is half the height of the Mini-USB plug, and nearly as wide. Micro-USB supports OTG, that is, in the absence of a host (such as a personal computer), data can be directly transferred between portable devices. It is compatible with USB1.1 and USB 2.0 specifications.
Please insert the USB flash drive into the corresponding USB port of the computer; the folder window or the USB icon will pop-up automatically. To stop using the USB flash drive, please use “Safely Remove Hardware” and choose to eject the USB flash drive, then remove the USB flash drive from the computer.
When you’re done with using the USB device, perform the “Safely Remove Hardware” action before removing the USB device. If the data is important, please develop a habit of making backups on other storage devices.
The theoretical data transmission speed of USB2.0 is slower than that of USB 3.1, but the function of storing data is no different. Please note that the USB 3.1 standard USB drive or port is backward compatible with the USB2.0 interface.
USB3.0 is backward compatible with USB2.0, so reading and writing data will not be affected. However, the use of a USB3.0 USB drive in a USB2.0 port will limit the transmission speed.
Please go to “My Computer”, right click on the USB flash drive icon and click “Properties” to display the capacity of the flash drive device. You can also confirm the capacity of the USB flash drive through “Disk Management” in “Computer Management”. (The function names may be different for different computer systems.) How does the USB flash drive store data? The USB flash drive uses NAND Flash as a component for storing data. The NAND Flash stores data by means of charging and discharging (writing/erasing). This type of storage device has the advantages of lighter weight, smaller size, lower power consumption, shock resistance, and better performance than traditional hard disks.
Right click on the USB drive icon and select “Rename” to change the name of the USB flash drive, or change the name in the “Disk Volume” field by formatting. To avoid losing any data, please back up your drive before formatting.
Please avoid unplugging the USB flash drive during data transfer. This action might cause data lost during the transfer process, and may even cause the USB flash drive to function abnormally. When you’re done using the USB flash drive, please go to “Safely Remove Hardware” first and then remove the USB flash drive from the port.
Currently, the Lexar Media Manager app works with the Lexar JumpDrive® C25i flash drive. For a listing of products that the Lexar Media Manager works with, check out the compatibility list on www.lexar.com/support. To determine if this app is right for your Lexar iOS-compatible product, visit your product’s information page on lexar.com. How do I get the Lexar Media Manager app? You can download the app from the App store®.
I see both on the App Store. The Lexar Mobile Manager app is an app that is compatible with older Lexar products, and not with more recent Lexar iOS-compatible products. For more information on which app is compatible with your Lexar product, refer to the compatibility chart on the Lexar support page at www.lexar.com/support
No, the Lexar Media Manager is an app that works with Apple® iOS products.
The app is compatible with iPhone 5/5s/5c, iPhone 6/6s/6s Plus, iPhone 7/7 Plus, iPhone SE, iPad mini 2/3/4, iPad 4, iPad Air 1/2, iPad Pro 9.7 inch/12.9 inch, and iPod touch (sixth generation). Which music and video file formats are compatible with the Lexar Media Manager? Files supported: Music—MP3/CAF/AAC/AIF/WAV/AIFF/M4A. Video—AVI/FLV/MP4/MOV/M4V/MKV/MPG/RM/RMVB/WMV/3GP Note: Does not support streaming of DRM-protected content. Contact your content provider for details and restrictions.
No, the Media Manager app will only work with Lexar products.
The functionality of the app is the same. There may be slight differences in navigation due to the available screen size of the tablet vs. the iPhone format. Phone navigation – Encrypt (or Decrypt), Rename, Get info, Zip, and Zip and Lock are all located under “More.” Tablet navigation—More functions visible On the Home screen, what does the percentage and the “free” refer to under Internal Storage and External Storage? The home screen displays your available storage on your device (phone/tablet) under Internal Storage, and your available storage on your connected Lexar product under External Storage.
Tapping on Internal Storage on the Home screen provides access to only those files stored in the app’s internal storage, and does not provide access to all files on your device.
External storage is the storage on your connected Lexar iOS-compatible device. Why does External Storage say N/A? External Storage will display N/A until you connect your Lexar iOS-compatible device.
Tap on the refresh icon in the upper right corner of the Home screen to immediately refresh your available storage display.
Tapping on “Music,” “Photos,” “Videos,” or “Documents” will display only those file types, whether stored in Internal Storage (within the app), or in External Storage (on your Lexar device). Backup will take you to the backup function, and camera will launch the app’s camera.
To access the Settings screen, tap on the settings icon located in the upper right corner of the Home screen.
Turning on the Support function creates a new email to the Lexar support team from the primary email address linked to your device. It will automatically include your app specifications, making it easy for you to send an email to get answers based on your version of the app.
This function will only work with devices with TouchID. TouchID must be available and enabled on your device.
The Auto Backup function in the Settings screen will allow automatic backups of photos, contacts, or both, every time your Lexar iOS-compatible product is connected to your device. You can still perform manual backups at any time, regardless of whether the Auto Backup function is turned on or not.
This function will back up photos and videos that are stored in your camera roll, and contacts stored on your device. It will not back up any files saved in the app’s Internal Storage.
The functions within Camera Settings on the app’s Settings screen control the settings for videos taken with the app camera only.
No, the automatic backup function does not automatically delete files after backup. To do this, select manual backup of photos. When doing a manual backup of photos on my iPhone and selecting “Yes” to the message asking whether I want to delete the photos after backup.
For safety and in case of accidental deletion, your iOS device keeps a folder in your Photo Album of “Recently Deleted” photos. Your deleted photos will be in this folder for 30 days, at which time they will expire. You can delete them immediately by navigating to the folder and selecting all (or some) of the photos and delete them immediately. Once the photos are removed completely from your device, you will notice the storage space percentage and free under Internal Storage on the Home screen will reflect the updated storage availability.
Only music files not protected by Digital Rights Management (DRM) can be managed with the Lexar Media Manager app. Files that are protected may show up on your music file list in the app, but they will appear greyed out, and you will not be able to select those files.
Your password is unique to you and Lexar does not keep a copy of it, so there is no way to retrieve a copy of it when it is lost. It’s a good idea to choose a password you know you’ll remember, or jot it down somewhere so you can access it if you forget it. Additional Resources I still have questions about the app.
You can download the full Lexar Media Manager User Guide, view warranty information, and find other support information at www.lexar.com/support
Addressing the latest developments in technology, Lexar has updated its existing Lexar Professional USB 3.0 Dual-Slot Reader to include UDMA 7 support. This allows you to leverage the speed enhancements of the latest high-performance Lexar Professional CompactFlash cards for even faster file transfer. For older Lexar Professional USB 3.0 Dual-Slot Card Readers, a firmware download is essential for CF 1000x card functionality. The firmware download is located here. What is UDMA 7? UDMA 7, which stands for Ultra Direct Mode Access 7, is the latest transfer mode under the UDMA interface. UDMA 7 allows a maximum transfer rate of up to 167MB/sec. This can be compared to the previous UDMA mode, UDMA 6, which allowed transfer rates of up to 133MB/sec. https://www.lexar.com/wp-content/uploads/2017/09/30.png
Yes, the reader is backwards compatible with USB 2.0 devices; however, the reader’s transfer speed will be reduced to 2.0 performance levels. You’ll need to connect the reader to a USB 3.0 device to maximize the performance capabilities of the reader.
If you’re using a computer with USB 3.0 port, you will need to install a USB 3.0 driver onto the computer. The driver should be provided by the system or adapter manufacturer. If you’re plugging into a USB 2.0 port, there’s no driver needed.
Performance may vary, depending on the read/write speed of the card and your system’s configuration. In order to experience the performance benefits of the Lexar Professional USB 3.0 Dual-Slot Reader, it must be plugged in to a USB 3.0 host device.
The Lexar Professional USB 3.0 Dual-Slot Reader supports the latest UDMA CompactFlash® (CF), SDXC™ (not supported on all operating system platforms), and SD UHS-I (SD 3.0) memory cards. It’s also backwards compatible with all standard CF, SD™, and SDHC™ cards.
Yes, but before inserting the SDXC card into the reader, please make sure the operating system of your computer is compatible with SDXC cards and supports the exFAT file format.
Verify that the USB cable is properly connected to the USB port, and insert a card into the reader to see if the light flashes.
Yes, the reader works with Mac OS 10+. However, we are aware of the compatibility issues users may be experiencing when trying to use the Lexar Professional USB 3.0 Dual-Slot Reader with the newest MacBooks, and we’re working diligently to provide a firmware upgrade in the near future.
Yes, the reader works with Windows 7, Vista™, and XP.
Yes, but before inserting the SDXC card into the reader, please make sure the operating system of your computer is compatible with SDXC cards and supports the exFAT file format.
Transfer files from multiple cards at once with the fully customizable Lexar Professional Workflow line of products. The line includes your choice of two four-bay hubs (Thunderbolt™ 2/USB 3.0 or USB 3.0), a selection of card readers (SDHC™/SDXC™ UHS-II, CompactFlash® UDMA 7, XQD™ 2.0, CFast™ 2.0, and microSDHC™/microSDXC™ UHS-II), and a two-port USB 3.0 hub. Its innovative, modular design lets you create a custom setup, while its high-speed performance lets you offload your work, faster.
Four-bay hubs: Lexar Professional Workflow HR1 (four-bay USB 3.0 reader hub) Lexar Professional Workflow HR2 (four-bay Thunderbolt 2/USB 3.0 reader hub) Card readers: Lexar Professional Workflow SR2 (SD UHS-II USB 3.0 reader) Lexar Professional Workflow CFR1 (CompactFlash USB 3.0 reader) Lexar Professional Workflow XR2 (XQD 2.0 USB 3.0 reader) Lexar Professional Workflow CR1 (CFast 2.0 USB 3.0 reader) Lexar Professional Workflow CR2 (CFast 2.0 Thunderbolt/USB 3.0 reader) Lexar Professional Workflow UR2 (three-slot microSDHC/microSDXC UHS-II USB 3.0 reader) USB 3.0 hub: Lexar Professional Workflow UH1 (two-port USB 3.0 hub) What’s included in each product box? Hubs: USB 3.0 hub (Professional Workflow HR1) Hub USB 3.0 cable Power supply Applicable power adapter for your region (check package description), and four covers to protect unused reader bays Thunderbolt 2/USB 3.0 hub (Professional Workflow HR2) Hub Thunderbolt 2 cable USB 3.0 cable Power supply Power adapters and four covers to protect unused reader bays Readers: USB 3.0 readers (Professional Workflow SR2, CFR1, XR2, CR1, and UR2) Reader USB 3.0 cable Thunderbolt 2/USB 3.0 reader (Professional Workflow CR2) Reader Thunderbolt cable USB 3.0 cable USB 3.0 hub: Two-port USB 3.0 hub USB 3.0 cable
Lexar Professional Workflow provides high-speed file transfer at USB 3.0 speeds when using a USB 3.0 port. The throughput is totally dependent on your system specifications, including hard drive write speed, processor speed, memory, and operating system (not to mention the read speed of the cards you’re transferring from). All these variables make it hard to quote an actual performance rating. However, you can expect to see the best performance possible when using a well-equipped computer and a card with fast transfer speeds. Using the Thunderbolt 2 hub, you can expect to see even faster performance. Theoretical limits establish USB 3.0 at 5gbps and Thunderbolt 2 at 20gbps. Therefore, you can generally expect to see up to 4x the performance depending on all the inputs listed above. Performance can greatly vary depending on card speed and the specs of your computer system. Why is it better to include a hub in my setup, rather than using a standalone single-slot reader? The main advantage is that you’ll save time with the ability to transfer data from multiple cards at once (concurrent transfer). With a single-slot reader, you can only transfer content one card at a time (consecutive transfer). With the hub fully populated with your choice of reader or hub modules, you can offload your work, faster. This lets you get to editing, sharing, and eventually back to shooting much sooner.
Yes, that’s one of the biggest advantages of using the Lexar Professional Workflow line—the ability to design a custom setup that fits your specific needs. For example, a Nikon D4 shooter may want two CompactFlash (CF) readers and two XQD 2.0 readers, whereas a Canon 5D Mark III shooter may want three CF readers and one SD UHS-II reader. Others may want one or more of the two-port USB 3.0 hubs as part of their workflow setup. Who is this line designed for? This product line was created with professional photographers, videographers, and enthusiasts in mind. It’s an excellent choice for those shooting with multiple cards, or using multiple cameras/video cameras. With the ability of today’s cameras to capture RAW images, high-res photos, 4K video, and beyond, there is a need for faster, higher capacity cards, and quicker transfer of large amounts of data from multiple cards. Now these functions can be done concurrently. And the two-port USB 3.0 module allows you to connect USB flash drives or additional readers, and even charge those devices. Setup and Use Can I use the power adapter that came with my Professional Workflow HR1 with HR2? No, the Professional Workflow HR2 hub requires more power and therefore comes with a larger power supply. Please do not mix the power supplies between the units.
Yes, each reader package includes a USB cable so you can use them on their own. This makes them an excellent on-the-go solution.
Yes, each module package includes a USB cable so you can use them on their own. This makes them excellent on-the-go solutions.
To conveniently daisy-chain the hub anywhere in your lineup, you can use both Thunderbolt 2 ports on the back of the hub. Simply connect one Thunderbolt 2 cable from the hub to your computer or other device and then connect the hub to the Thunderbolt 2 cable from the next device, such as a monitor or hard drive. Thunderbolt 2 technology allows for up to six devices to be daisy-chained to one port on your computer. To ensure the best performance, consider placing your hub at the beginning of the chain, closest to your computer.
This indicates that the reader is in the process of transferring data from your card to your computer. When your reader’s LED is blinking, do not remove the card or remove the reader from the hub.
Photographers and videographers who are shooting solely with CompactFlash (CF)-based cameras will likely want to purchase four CF readers. Nikon D5 shooters will likely want two CF and two XQD 2.0 readers (assuming they are using both slots in their camera). Canon DSLR users will likely want a combination of CF and SD UHS-II readers (since some Canon cameras tend to use either of both form factors). Many photographers use CF-based cameras for their primary camera and a point-and-shoot camera for general use or scouting. These shooters may also want a combination of CF and SD readers in their hub.
This connector is durable and provides for solid, smooth insertion and removal of the readers in and out of the hub.
Yes, in order for either hub to work correctly, it must be plugged in. There is not enough power supplied from the USB port on a computer to power this device.
Occasionally, the hub may not be recognized after waking. If this happens, please unplug your HR1 or HR2 hub from your Mac and plug it back in. If this doesn’t resolve the issue, you may need to restart your computer.
We’ve worked diligently to provide as many region-specific adapters as possible, but we’re unable to meet the need in every country. If you are in one of these regions, you can purchase a travel converter that meets your country’s international power adapter needs to use with the power supply provided with your Professional Workflow Reader HR1 or HR2 hub. Please ensure that the adapter you purchase meets the requirements of your country’s power adapter guidelines.
This error occurs when the power cord is not connected to the Professional Workflow HR1 or HR2 hub, or the power supply is not connected to a wall outlet or a power source. Properly connect the hub to resolve the error.
Currently, the product line includes readers that support SD UHS-I and UHS-II, CompactFlash UDMA 7, CFast or CFast 2.0 (Thunderbolt or USB 3.0), XQD 2.0, and microSD UHS-I and UHS-II formats. And for versatility, the CFast 2.0 reader is backwards compatible with the 1.0 format (at 1.0 speeds). As technology evolves and we launch new card formats, we’ll also create new readers for this product line. This ability to purchase new reader formats helps to future-proof your workflow setup and save you money.
No. The XQD 2.0 reader is not backwards-compatible with XQD 1.0 format cards. XQD 2.0 memory cards can be identified by a boxed USB logo on the card label.
Yes, the reader is fully backwards-compatible with SD UHS-I cards (at UHS-I speeds), so you can use both SD UHS-I and UHS-II cards with the reader.
Yes, if you plug a reader directly into a computer with the included USB 3.0 cable you can transfer data from each card concurrently. This is also possible using the Professional Workflow HR2 (high-speed Thunderbolt 2) or HR1 (USB 3.0) hub. NOTE: First-generation Professional Workflow HR1 hubs (Rev A) only support up to two Professional Workflow UR2 readers at once. To find the Professional Workflow HR1 model you’re using (Rev A or Rev B), check the label on the bottom of the product.
All Professional Workflow HR2 hubs leverage a high-speed Thunderbolt 2 interface, and accommodate up to four Professional Workflow UR2 three-slot readers, filling the hub and providing fast file transfer from 12 cards at once. The latest generation of HR1 USB 3.0 hubs (Rev B) are also capable of transferring files concurrently from up to four UR2 readers. NOTE: First-generation Professional Workflow HR1 hubs (Rev A) only support up to two Professional Workflow UR2 readers at once. To find the Professional Workflow HR1 model you’re using (Rev A or Rev B), check the label on the bottom of the product.
Professional Workflow HR2 and CR2: USB 2.0/3.0 port: Mac OS X 10.6.8+ Thunderbolt 2 port: 10.8.5+ USB 2.0/3.0 and Thunderbolt 2 port: Windows 8/7 Thunderbolt 2 port USB 2.0/3.0 port Card readers: Mac OS® 10.6+ Windows® 8/7 USB 3.0 interface (backwards compatible with USB 2.0 at slower speeds) Two-port USB 3.0 hub: USB 3.0 interface (backwards compatible with USB 2.0 at slower speeds)
Yes, Windows users should visit lexar.com/downloads to download the Thunderbolt 2 driver needed to ensure Windows PC compatibility.
Yes, on most third-party USB 3.0 cards, it does. However, since this is an aftermarket product, the performance could potentially be slower than true USB 3.0 speeds.
Yes. However, the software only supports consecutive downloads, not concurrent downloads. So downloads may take longer to complete.
Yes, and since Photo Mechanic supports concurrent downloading, download speeds are exceptionally fast.
Yes. The Portable SSD will fit in either hub and complements the existing offerings in the Workflow line.
CFexpress USB 3.1 Reader only supports CFexpress Type B cards. Is my XQD card reader compatible with CFexpress Type B card? Please check compatibility of your reader with your manufacture.
As picture quality and resolutions on digital cameras have improved, the need to save and store larger photo and video files has increased. Earlier versions of digital cameras often featured built-in, non-expandable memory for storing pictures and video. Memory capacity of these cameras could be reached quickly, forcing users to download pictures constantly to their computers or erase pictures before taking another photograph. This is very inconvenient for users who want to use their cameras without having a computer nearby. Today’s leading digital camera manufacturers typically feature removable digital film cards for capturing, storing, and swapping images. Popular removable memory solutions include SD, microSD, CompactFlash, and CFast. Typically, camera manufacturers include a minimum-capacity card with the camera, just enough memory to provide a good out-of-the-box experience for the user. As the capacity of that card is reached, either the user must download the photos to a computer, erase pictures, or replace the card to continue taking pictures. That’s why for many typical picture-taking situations like vacations, weddings, or sporting events, the digital photographer needs more digital film.
Digital film uses non-volatile flash memory, meaning it does not require power to store the pictures taken. Flash memory technology is ideal for applications that require portability and ruggedness. There are three main types of flash memory used for digital cameras today: SD, microSD, CompactFlash, and CFast formats. Secure Digital (SD): The size of a postage stamp, SD cards are compact and flexible for use in multiple consumer electronic devices. Its ability to deliver high performance allows consumers to quickly capture photo and video files in a reliable and easy-to-use format. microSD: The smallest memory card that can be bought, which is about a quarter of the size of a normal-sized SD card. microSD cards are used in mobile phones, tablets, action cameras, drones and other mobile devices. CompactFlash: A small form factor (about the size of a matchbook) that combines non-volatile storage, high-capacity options and industry-standard compatibility, which is absolutely essential for digital cameras and handheld computing devices. Because they are designed to the guidelines set by the CompactFlash Association, a base-level assurance of compatibility has been set between all-certified CompactFlash cards and any CompactFlash-compliant device. CFast: The latest evolution of card format from the CompactFlash Association and provides a higher maximum transfer rate than CompactFlash® cards. CFast cards are similar in size to CompactFlash cards, but do not have any pins which can bend in the connector. The format was primarily designed to support the capabilities of next-generation of camcorders and DSLR cameras.
The CompactFlash Association (CFA) was established in 1995, as a non-profit, mutually beneficial industry association. The CFA’s premise is that CompactFlash technology will result in the intro-duction of a new class of advanced, small, lightweight, low-powered mobile products that will significantly increase the productivity and enhance the lifestyle of millions of people. CompactFlash provides the capability to easily transfer all types of digital information and software between a large variety of digital systems. The goals of the CFA are to promote and encourage the worldwide adoption of CompactFlash technology as an open-industry standard. Information on the CompactFlash Association can be found at http://www.compactflash.org Is performance important when talking about digital film? As digital camera applications, camera resolutions, and picture and video file sizes continue to grow, the ability to both WRITE and READ large files have become critical performance requirement. Improved WRITE performance can significantly reduce the waiting time before another photograph can be taken (“image storage time”). Improved READ performance can significantly reduce the waiting time for photo and video files to be transferred to your computer–saving time and improving digital photography “workflow.” Lexar SD, CompactFlash and CFast cards significantly reduce file transfer time to your computer AND the time a picture file can be written to the card. While actual performance will vary between camera models, Lexar offers high-speed performance so you never miss the memories you want to save: a baby’s smile, a wedding kiss, or any other precious moment. What does 633x, 667x, 1000x, 1066x, 1667x, 1800x, 2000x and 3500x (1x=150KB/s) performance mean? Because digital film performance is so important in capturing the right picture at the right moment, Lexar has implemented an easy-to-understand system to indicate the speed at which the card is capable of storing data. The system is adopted from the CD-ROM industry, in which the performance of CD-ROM drives are rated in “x” increments, where 1x is equal to a sustained write speed capability of 150 kilobytes per second (KB/s). Lexar will continue to introduce faster products with greater “x” ratings, giving consumers an easy way to recognize the latest in high-performance digital photography. 633x = Up to 95MB/s read transfer, write speeds lower 667x = Up to 100MB/s read transfer, write speeds lower 1066x = Up to 160MB/s read transfer, write speeds lower 1667x = Up to 250MB/s read transfer, write speeds lower 1800x = Up to 270MB/s read transfer, write speeds lower 2000x = Up to 300MB/s read transfer, write speeds lower 3500x = Up to 525MB/s read transfer, write speeds lower.
How to format a flash-based storage device (JumpDrive/memory cards) in Windows: To format a Lexar device in Windows, connect it via USB or a compatible reader and follow these steps (note that this process will remove all data from your device):
1. Access Windows Explorer by holding the Windows key and pressing the letter ‘E’, or search for and run ‘This PC’ in Windows 10 (Computer in Windows 8 and earlier), and right-click on the drive letter corresponding to the flash device.
2. From the menu select ‘Format’
3. You can leave the settings as-is or select specific values if you need to for specific device and program compatibility.
4. Click ‘Start’. 5.You will receive a message when formatting is complete.
How to format a flash-based storage device (JumpDrive/memory cards) in OS X (note that this process will remove all data from your device): To format a Lexar device in OS X, connect it via USB or a compatible reader and follow these steps:
1. Select the “Finder”
2. Select “Applications”
3. Select “Utilities”
4. Select “Disk Utilities”
5. Select the Lexar device from the list of drives on the left
6. Select “Erase”
7. You will typically keep the settings on MS DOS (FAT) or ExFAT and select a name for the device, but make any changes needed here for specific software/device compatibility
8. Select “Erase” at the bottom
9. On the confirmation pop up, select “Erase” again
1. Access Windows Explorer by holding the Windows key and pressing the letter ‘E’, or search for and run ‘This PC’ in Windows 10 (Computer in Windows 8 and earlier)
2. Navigate to the folder containing the data you wish to copy (for example, your Lexar storage device, or a documents folder on your PC)
3. Left-click on a file or folder you wish to copy. If copying multiple files, you can hold ‘Ctrl’ and click multiple files, or click-and-drag an outline around a group of files.
4. Right-click the selected file, and select Copy.
5. Navigate to the location you wish to copy a file to, such as another storage device or different folder.
6. Right-click in this location and select Paste.
1. Access Finder by selecting it from the Dock on the OS X desktop.
2. Navigate to the folder containing the data you wish to copy (for example, your Lexar storage device, or a documents folder on your system)
3. Click on a file or folder you wish to copy. If copying multiple files, you can hold ‘Command’ and click multiple files, or click-and-drag an outline around a group of files.
4. Hold ‘Command’ and press ‘C’ to copy the files to your clipboard.
5. Navigate to the location you wish to copy a file to, such as another storage device or different folder.
6. Hold ‘Command’ and press ‘V’ to paste the files from your clipboard to the new location. Device not working in windows If a storage device is malfunctioning regardless of what hardware or interfaces it is connected to, most common issues are caused by improperly removing the storage device from your computer or its card reader, corruption, an improper drive letter assignment, or a driver error. With the device connected, right-click the bottom-left corner (or Start button) on the desktop to open a Quick Access Menu, and then choose Device Management. In Windows 7 and earlier, open your start menu and search for Device Manager, then select it. – Click on the + sign next to Disk Drives, Other devices, and Universal Serial Bus controllers – Check if the Lexar storage device is listed in any of those places – If the device is listed, check whether there is a yellow exclamatory mark (!) or a question mark (?) next to it. – If there is yellow exclamatory mark (!) or a question mark (?) next to the device, right-click on it and select remove/uninstall. Unplug the device and reconnect it the computer should detect it automatically, if it has appropriate drivers If there is no yellow (?) or (!) mark on the Lexar storage device then you need to confirm/change the drive letter for the memory card/JumpDrive. You must have administrator privileges for your local computer in order to change drive letters under Windows. Right-click the bottom-left corner (or Start button) on the desktop to open Quick Access Menu, and then choose Disk Management. In Windows 10 and earlier, open your start menu and search for “Create and format Hard Disk Partitions.” – At this point it will appear your screen is divided into two separate areas. Please maximize the screen and focus on the bottom portion. You will see a listing that says something similar to the following. “Disk 0, Healthy, Primary, Active Partition.” – this will be your Hard Drive. You will also see any other drives you may have listed here, such as Recovery Drives, any External Hard Drives and your CD/DVD Drives. – Please check for any other Disk Numbers. For example, your memory card or Jumpdrive may show up as Disk 1, Removable. It will also list a capacity close to your memory card, for example a 4GB memory card should show around 3.7GB. – If the device is still not listed or it states “No Media”, the device’s controller or its connection to your system is malfunctioning. Try the storage device in another system or port, but if that does not help please contact us for further support. If it shows as unallocated, your partition has been damaged, and needs to be reformatted to continue using the device. – If neither of the above applies, right-click on the device and select “Change Drive letter and Paths” then click on “Change” and assign drive letter Z and then click on “Ok,”“Yes,” then “Ok.” If none of the above resolves your malfunction, please contact us for additional support. Device not working in OS X If the Lexar device is not working normally in the Mac OS, regardless of what hardware or interface you are connecting it through, please try the following steps:
1. Click on the File menu then on “System preferences”
2. Ensure that the hard drive, removable drive and optical bay are present
3. Click on the Apple icon, then on the hard drive in “System Profiler”
4. Click on Utilities and Disk Utility
5. Check if the device is visible in Disk Utility
6. Highlight the Jumpdrive/card and select “Erase” (note that this process will remove all data from your device)
7. In “Volume” select “DOS format” then “Erase”. You will then be able to see the device, unnamed, on the desktop. What are the file systems FAT32, ExFAT, NTFS and extended journaled? FAT32, ExFAT, NTFS, and Extended Journaled are some of the most common examples of file systems, which are methods by which data is arranged on a storage device. Very simply, the differences are as follows: FAT32 – 4GB (gigabyte) maximum file size and maximum storage device size can be as low as 2TB (terabytes). Compatible with both Mac and Windows. Typically used for legacy Operating Systems and older devices. ExFAT – A newer iteration of FAT32, requiring newer devices and operating systems, but effectively removing the file size limits and device size limits (ExFAT supports hundreds or thousands of terabytes). NTFS – Windows-specific, though has limited support in OS X. Typically used on a fixed hard drive, rather than removable storage. Like ExFAT, has less restrictive file size limitations, but due to its status as a primarily Windows-based file system, NTFS can conflict with non-PC hardware. Extended Journaled – Mostly Apple-specific when dealing with consumer products, and has limited support outside OS X/iOS platforms. Typically used as an Apple OS drive, with removable storage being formatted as FAT32/ExFAT instead. For best compatibility and interoperability of your Lexar storage product across multiple devices (especially non-PC devices, such as media readers built into TVs, Blu-Ray players, DVRs, etc.), we recommend formatting your device as ExFAT or FAT32. Specific hardware may require other file systems, however, including ones not listed here. For more information on a given device’s needs, please see your device’s documentation or manufacturer support for more details.
Lexar offers different warranty period for each product. Please refer to our Warranty Policy for details at https://www.lexar.com/support/warranties/
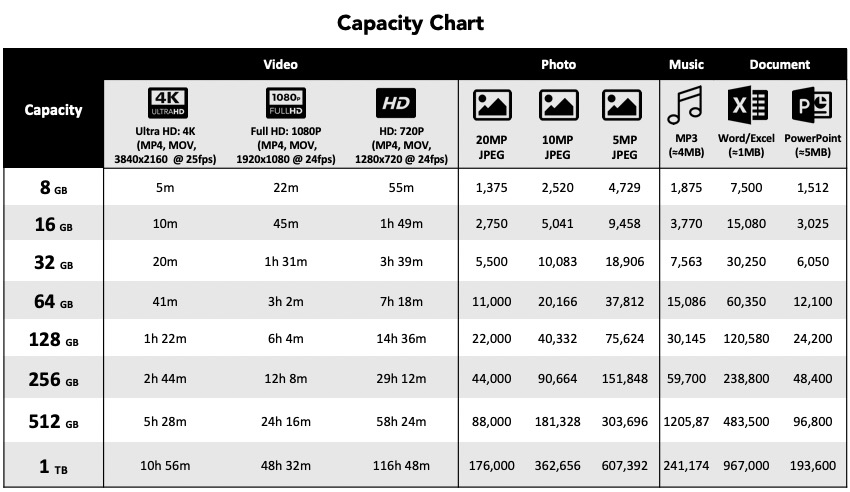
1 Megabyte (MB) = 1,000,000 bytes; 1 Gigabyte (GB) = 1,000,000,000 bytes; 1 Terabyte (TB) = 1,000,000,000,000 bytes (Mbps = Megabits per second, Fps = Frames per second, GB = Gigabytes, TB = Terabytes) . This capacity chart is for reference only. Actual performance, including but not limited to, video recording time or photo storage, may vary due to host device, selected resolution, compression and the content being recorded. Check your device’s owner’s manual for supported formats. Some of the listed storage capacity is used for formatting and other purposes and is not available for data storage. 1GB equals 1 billion bytes.
Simplified Chinese Windows 7 systems 32 bits and 64 bits Simplified Chinese Windows 10 systems 32 bits and 64 bits Traditional Chinese Windows 10 systems 64 bits English Windows 10 systems 64 bits Korean Windows 10 systems 64 bits Chinese Windows 8.1 systems 32 bits and 64 bits Chinese Windows 8 systems 64 bits Chinese Windows Vista systems 32 bits Does not support Chinese Windows XP systems
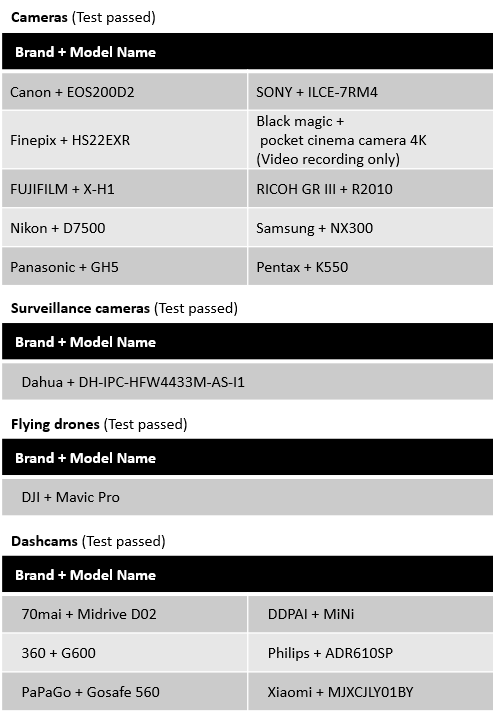
USB flash drives SD cards SSD drives with Trim commands disabled (Since the Trim commands will periodically perform a recycle action to the hard drive, this will cause the lost data to be unrecoverable by the recovery process) HDD Cameras, surveillance cameras, drones, and dashcams Some products such as cameras, surveillance cameras, drones, and dashcams will process the generated data in ways that have not been publicized, so full recovery by the recovery process cannot be guaranteed. The following is a list of devices that have been tested and passed:
FAT32、exFAT、NTFS
Accidental deletion Accidental formatting Partition lost File system header corrupted (FAT, $MFT)
Full formatting (Low-level formatting actions to the system) Overwritten data and files are not fully recoverable SSD drives with Trim commands enabled Encrypted drives
We cannot guarantee one hundred percent recovery of your data, but in most cases the data can be recovered normally using our software.
When this situation occurs, it could be due to the following reasons: (1)The file has been corrupted After a file has been deleted, it can be corrupted or overwritten by another file. Defragmentation, virus attacks or hacker activity will cause the file to be corrupted. (2)Fragmented files Some large files are stored in separate sectors on the hard drive, since they are too large be allocated to continuous sectors of the storage space. When the data from one or more sectors has been deleted, recovery is very difficult. Even if the initial address is accessible, the address information of the erased data is often lost.
It depends on the size of the storage space and the size of the data. The larger the data, the longer it will take; contrariwise, the smaller the data is, the shorter it will take.
Before using the Lexar Recovery Tool software, the success rate of recovering your files greatly depends on how the storage device is used, and whether there were any new written data after the accidental deletion. Do not continue to work on the storage device with the lost data on it! (1) You should not continue to use the drive which contains the accidentally deleted files. (2) Do not use operations such as copy, cut, or paste on the drive. (3) The more actions that have been done on the drive, the lower the success rate of recovery. (4) If recovery of lost data is needed, please do not defrag the drive or execute any tool that can possibly do further damage to the drive. Otherwise, it could erase the data of the file on the drive that you want to recover.
As picture quality and resolutions on digital cameras have improved, the need to save and store larger photo and video files has increased. Earlier versions of digital cameras often featured built-in, non-expandable memory for storing pictures and video. Memory capacity of these cameras could be reached quickly, forcing users to download pictures constantly to their computers or erase pictures before taking another photograph. This is very inconvenient for users who want to use their cameras without having a computer nearby. Today’s leading digital camera manufacturers typically feature removable digital film cards for capturing, storing, and swapping images. Popular removable memory solutions include SD, microSD, CompactFlash, and CFast. Typically, camera manufacturers include a minimum-capacity card with the camera, just enough memory to provide a good out-of-the-box experience for the user. As the capacity of that card is reached, either the user must download the photos to a computer, erase pictures, or replace the card to continue taking pictures. That’s why for many typical picture-taking situations like vacations, weddings, or sporting events, the digital photographer needs more digital film.
Digital film uses non-volatile flash memory, meaning it does not require power to store the pictures taken. Flash memory technology is ideal for applications that require portability and ruggedness. There are three main types of flash memory used for digital cameras today: SD, microSD, CompactFlash, and CFast formats. Secure Digital (SD): The size of a postage stamp, SD cards are compact and flexible for use in multiple consumer electronic devices. Its ability to deliver high performance allows consumers to quickly capture photo and video files in a reliable and easy-to-use format. microSD: The smallest memory card that can be bought, which is about a quarter of the size of a normal-sized SD card. microSD cards are used in mobile phones, tablets, action cameras, drones and other mobile devices. CompactFlash: A small form factor (about the size of a matchbook) that combines non-volatile storage, high-capacity options and industry-standard compatibility, which is absolutely essential for digital cameras and handheld computing devices. Because they are designed to the guidelines set by the CompactFlash Association, a base-level assurance of compatibility has been set between all-certified CompactFlash cards and any CompactFlash-compliant device. CFast: The latest evolution of card format from the CompactFlash Association and provides a higher maximum transfer rate than CompactFlash® cards. CFast cards are similar in size to CompactFlash cards, but do not have any pins which can bend in the connector. The format was primarily designed to support the capabilities of next-generation of camcorders and DSLR cameras.
The CompactFlash Association (CFA) was established in 1995, as a non-profit, mutually beneficial industry association. The CFA’s premise is that CompactFlash technology will result in the intro-duction of a new class of advanced, small, lightweight, low-powered mobile products that will significantly increase the productivity and enhance the lifestyle of millions of people. CompactFlash provides the capability to easily transfer all types of digital information and software between a large variety of digital systems. The goals of the CFA are to promote and encourage the worldwide adoption of CompactFlash technology as an open-industry standard. Information on the CompactFlash Association can be found at http://www.compactflash.org Is performance important when talking about digital film? As digital camera applications, camera resolutions, and picture and video file sizes continue to grow, the ability to both WRITE and READ large files have become critical performance requirement. Improved WRITE performance can significantly reduce the waiting time before another photograph can be taken (“image storage time”). Improved READ performance can significantly reduce the waiting time for photo and video files to be transferred to your computer–saving time and improving digital photography “workflow.” Lexar SD, CompactFlash and CFast cards significantly reduce file transfer time to your computer AND the time a picture file can be written to the card. While actual performance will vary between camera models, Lexar offers high-speed performance so you never miss the memories you want to save: a baby’s smile, a wedding kiss, or any other precious moment. What does 633x, 667x, 1000x, 1066x, 1667x, 1800x, 2000x and 3500x (1x=150KB/s) performance mean? Because digital film performance is so important in capturing the right picture at the right moment, Lexar has implemented an easy-to-understand system to indicate the speed at which the card is capable of storing data. The system is adopted from the CD-ROM industry, in which the performance of CD-ROM drives are rated in “x” increments, where 1x is equal to a sustained write speed capability of 150 kilobytes per second (KB/s). Lexar will continue to introduce faster products with greater “x” ratings, giving consumers an easy way to recognize the latest in high-performance digital photography. 633x = Up to 95MB/s read transfer, write speeds lower 667x = Up to 100MB/s read transfer, write speeds lower 1066x = Up to 160MB/s read transfer, write speeds lower 1667x = Up to 250MB/s read transfer, write speeds lower 1800x = Up to 270MB/s read transfer, write speeds lower 2000x = Up to 300MB/s read transfer, write speeds lower 3500x = Up to 525MB/s read transfer, write speeds lower.
How to format a flash-based storage device (JumpDrive/memory cards) in Windows: To format a Lexar device in Windows, connect it via USB or a compatible reader and follow these steps (note that this process will remove all data from your device):
1. Access Windows Explorer by holding the Windows key and pressing the letter ‘E’, or search for and run ‘This PC’ in Windows 10 (Computer in Windows 8 and earlier), and right-click on the drive letter corresponding to the flash device.
2. From the menu select ‘Format’
3. You can leave the settings as-is or select specific values if you need to for specific device and program compatibility.
4. Click ‘Start’. 5.You will receive a message when formatting is complete.
How to format a flash-based storage device (JumpDrive/memory cards) in OS X (note that this process will remove all data from your device): To format a Lexar device in OS X, connect it via USB or a compatible reader and follow these steps:
1. Select the “Finder”
2. Select “Applications”
3. Select “Utilities”
4. Select “Disk Utilities”
5. Select the Lexar device from the list of drives on the left
6. Select “Erase”
7. You will typically keep the settings on MS DOS (FAT) or ExFAT and select a name for the device, but make any changes needed here for specific software/device compatibility
8. Select “Erase” at the bottom
9. On the confirmation pop up, select “Erase” again
1. Access Windows Explorer by holding the Windows key and pressing the letter ‘E’, or search for and run ‘This PC’ in Windows 10 (Computer in Windows 8 and earlier)
2. Navigate to the folder containing the data you wish to copy (for example, your Lexar storage device, or a documents folder on your PC)
3. Left-click on a file or folder you wish to copy. If copying multiple files, you can hold ‘Ctrl’ and click multiple files, or click-and-drag an outline around a group of files.
4. Right-click the selected file, and select Copy.
5. Navigate to the location you wish to copy a file to, such as another storage device or different folder.
6. Right-click in this location and select Paste.
1. Access Finder by selecting it from the Dock on the OS X desktop.
2. Navigate to the folder containing the data you wish to copy (for example, your Lexar storage device, or a documents folder on your system)
3. Click on a file or folder you wish to copy. If copying multiple files, you can hold ‘Command’ and click multiple files, or click-and-drag an outline around a group of files.
4. Hold ‘Command’ and press ‘C’ to copy the files to your clipboard.
5. Navigate to the location you wish to copy a file to, such as another storage device or different folder.
6. Hold ‘Command’ and press ‘V’ to paste the files from your clipboard to the new location. Device not working in windows If a storage device is malfunctioning regardless of what hardware or interfaces it is connected to, most common issues are caused by improperly removing the storage device from your computer or its card reader, corruption, an improper drive letter assignment, or a driver error. With the device connected, right-click the bottom-left corner (or Start button) on the desktop to open a Quick Access Menu, and then choose Device Management. In Windows 7 and earlier, open your start menu and search for Device Manager, then select it. – Click on the + sign next to Disk Drives, Other devices, and Universal Serial Bus controllers – Check if the Lexar storage device is listed in any of those places – If the device is listed, check whether there is a yellow exclamatory mark (!) or a question mark (?) next to it. – If there is yellow exclamatory mark (!) or a question mark (?) next to the device, right-click on it and select remove/uninstall. Unplug the device and reconnect it the computer should detect it automatically, if it has appropriate drivers If there is no yellow (?) or (!) mark on the Lexar storage device then you need to confirm/change the drive letter for the memory card/JumpDrive. You must have administrator privileges for your local computer in order to change drive letters under Windows. Right-click the bottom-left corner (or Start button) on the desktop to open Quick Access Menu, and then choose Disk Management. In Windows 10 and earlier, open your start menu and search for “Create and format Hard Disk Partitions.” – At this point it will appear your screen is divided into two separate areas. Please maximize the screen and focus on the bottom portion. You will see a listing that says something similar to the following. “Disk 0, Healthy, Primary, Active Partition.” – this will be your Hard Drive. You will also see any other drives you may have listed here, such as Recovery Drives, any External Hard Drives and your CD/DVD Drives. – Please check for any other Disk Numbers. For example, your memory card or Jumpdrive may show up as Disk 1, Removable. It will also list a capacity close to your memory card, for example a 4GB memory card should show around 3.7GB. – If the device is still not listed or it states “No Media”, the device’s controller or its connection to your system is malfunctioning. Try the storage device in another system or port, but if that does not help please contact us for further support. If it shows as unallocated, your partition has been damaged, and needs to be reformatted to continue using the device. – If neither of the above applies, right-click on the device and select “Change Drive letter and Paths” then click on “Change” and assign drive letter Z and then click on “Ok,”“Yes,” then “Ok.” If none of the above resolves your malfunction, please contact us for additional support. Device not working in OS X If the Lexar device is not working normally in the Mac OS, regardless of what hardware or interface you are connecting it through, please try the following steps:
1. Click on the File menu then on “System preferences”
2. Ensure that the hard drive, removable drive and optical bay are present
3. Click on the Apple icon, then on the hard drive in “System Profiler”
4. Click on Utilities and Disk Utility
5. Check if the device is visible in Disk Utility
6. Highlight the Jumpdrive/card and select “Erase” (note that this process will remove all data from your device)
7. In “Volume” select “DOS format” then “Erase”. You will then be able to see the device, unnamed, on the desktop. What are the file systems FAT32, ExFAT, NTFS and extended journaled? FAT32, ExFAT, NTFS, and Extended Journaled are some of the most common examples of file systems, which are methods by which data is arranged on a storage device. Very simply, the differences are as follows: FAT32 – 4GB (gigabyte) maximum file size and maximum storage device size can be as low as 2TB (terabytes). Compatible with both Mac and Windows. Typically used for legacy Operating Systems and older devices. ExFAT – A newer iteration of FAT32, requiring newer devices and operating systems, but effectively removing the file size limits and device size limits (ExFAT supports hundreds or thousands of terabytes). NTFS – Windows-specific, though has limited support in OS X. Typically used on a fixed hard drive, rather than removable storage. Like ExFAT, has less restrictive file size limitations, but due to its status as a primarily Windows-based file system, NTFS can conflict with non-PC hardware. Extended Journaled – Mostly Apple-specific when dealing with consumer products, and has limited support outside OS X/iOS platforms. Typically used as an Apple OS drive, with removable storage being formatted as FAT32/ExFAT instead. For best compatibility and interoperability of your Lexar storage product across multiple devices (especially non-PC devices, such as media readers built into TVs, Blu-Ray players, DVRs, etc.), we recommend formatting your device as ExFAT or FAT32. Specific hardware may require other file systems, however, including ones not listed here. For more information on a given device’s needs, please see your device’s documentation or manufacturer support for more details.
Lexar offers different warranty period for each product. Please refer to our Warranty Policy for details at https://www.lexar.com/support/warranties/
While CFexpress Type B cards and XQD cards can fit in the same slot, compatibility depends on the host devices. Please check compatibility of your host device with your manufacture.
The difference between the three cards are the form factor, number of lanes and maximum performance. Currently the most used card is the Type B due to its similarities in size with XQD cards.
CFexpress is the latest standard for removable media cards proposed by the CompactFlash Association. The standard uses PCIe 3.0 interface with 1 to 4 lanes where 1 GB/s data can be provided per lane. NVM Express is also supported to provide low overhead and latency. For more information, click here https://www.compactflash.org/cfexpress
Check the compatibility list for Lexar: https://www.lexar.com/support/compatibility/
The VPG-20 logo represent adherence to the Video Performance Guarantee-20 specification for professional-quality video. When used with a compatible camera, the VPG-20 logo on a card means that the system has been tested and guaranteed for professional video capture streams at up to 20MB/sec. This enables professional-quality video capture at high frame rates with no dropped frames.
The VPG-65 logo represent adherence to the Video Performance Guarantee-65 specification for professional-quality video. When used with a compatible camera, the VPG-65 logo on a card means that the system has been tested and guaranteed for professional video capture streams at up to 65MB/sec. This enables professional-quality video capture at high frame rates with no dropped frames.
M.2 slot may only support SATA protocol. Please contact the service center or visit the websites of your PC/laptop/motherboard manufacturer to realize the specification details before purchasing M.2 PCIe SSD.
A constant writing speed class for video recording. There are three kinds of Speed Classes, “Speed Class”, “UHS Speed Class” and “Video Speed Class.” This Speed Class provide the constant speed necessary for video recording by designating a minimum writing performance, this include V6、V10、V30、V60 and V90. V6 Speed Class means that the minimum write speed of the memory card needs to reach 6MB/s, V10 is 10MB/s, 30 is 30MB/s, and so on. V60 and V90 can be applied to high resolution and high quality 8K video recording, and V30 can be applied to 4K resolution. SD makers will print these speed class symbols on memory card (V60, V90…etc.). These speed class symbols will be applied to SDHC, SDXC, UHS-I, UHS-II and SD memory card help users decide the best combination for reliable recording.
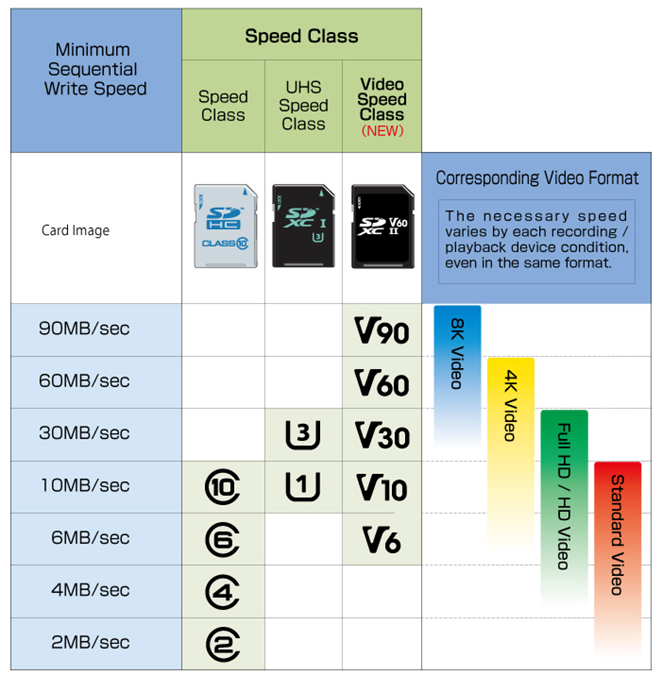
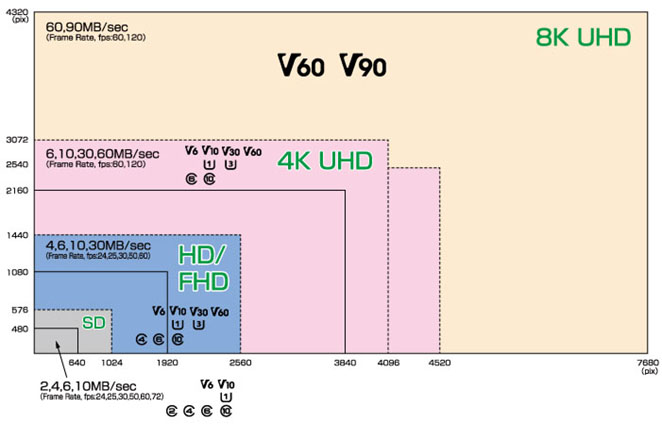
*Source: SD Association
It is used for smartphone application performance classification. Application Performance Class 1 (A1) and Class 2 (A2) defines the minimum average of random read/write IOPS. IOPS specification of A1 is read 1500IOPS /write 500IOPS, and the minimum sustained sequential performance is 10MB/s. IOPS specification of A2 is several times faster than A1. The random read is 4000IOPS, and the random write is 4000IOPS. That means the write performance of A2 is faster than A1 read performance, and the minimum sustained sequential performance is also 10MB/s.
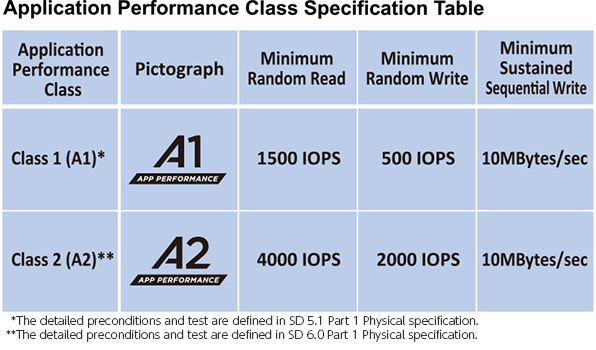
*Source: SD Association
1 Megabyte (MB) = 1,000,000 bytes; 1 Gigabyte (GB) = 1,000,000,000 bytes; 1 Terabyte (TB) = 1,000,000,000,000 bytes (Mbps = Megabits per second, Fps = Frames per second, GB = Gigabytes, TB = Terabytes) . This capacity chart is for reference only. Actual performance, including but not limited to, video recording time or photo storage, may vary due to host device, selected resolution, compression and the content being recorded. Check your device’s owner’s manual for supported formats. Some of the listed storage capacity is used for formatting and other purposes and is not available for data storage. 1GB equals 1 billion bytes.